Quickstart
This guide shows you how to create and run your first automation in Automation Hub. You'll start with a Workspace, organize it in a Collection, build a Job, and define the Workflow steps visually.
Concept flow
Workspace → Collection → Job → Workflow Steps
- Workspace: Groups all your automations for a team or environment
- Collection: Organizes related jobs within a workspace
- Job: The complete automation workflow with a name and description
- Workflow Steps: Individual actions (fetch data, send message, call API, etc.)
What you'll build
A simple Slack Summary Report automation that:
- Gets triggered manually or on a schedule
- Reads data from a data source (Google Sheets, database, API)
- Posts the summary to a Slack channel or thread
Prerequisites
- Automation Hub running (UI accessible)
- At least one Connection configured (Slack, Google Sheets, etc.)
- Basic understanding of your data source
Before running automations against live systems, turn on Test Mode from the Canvas toolbar (the Enable Test Mode toggle). Steps with pinned output return saved data instead of calling real systems — ideal for validating your workflow end to end safely. See Test Mode.
New to the interface? Start with Navigating Automation Hub for a tour of the tabs, search, and card actions.
1. Create a Workspace
A Workspace is your top-level container for all automations.
- Open the Workspaces tab
- Open the Create dropdown (top of the page) and choose Workspace — or, on an empty tab, click + Create Workspace
- In the slide-in panel, name it
Production Use Cases - Click Create
2. Create a Collection
A Collection groups related jobs within a workspace.
- Open the Collections tab
- Open the Create dropdown and choose Collection — or, on an empty tab, click + Create collection
- Name it
Slack Notificationsand selectProduction Use Casesas its workspace - Click Create
3. Create a Job and Build Your Workflow
A Job is your automation. It contains ordered Steps that run sequentially.
- Open the Create dropdown and choose Job — or, on an empty Jobs tab, click + Create Job
- Give it a name (e.g., "Data Sync", "Report Generator", "Alert Monitor") and select its workspace and collection
- Click Create
- On the new job's card, click the Canvas icon button to open the builder
Build the workflow in the Canvas
The builder opens on three tabs — Configurations, Canvas, and Executions. The Canvas is a visual, drag-and-drop interface where you design your automation workflow. Steps and triggers are added from the Step Palette:
- Click the + button (Toggle Step Palette) to open the Step Palette
- On the Triggers tab, search and add a trigger — Manual, Schedule, Webhook, Chat, Form, and more
- Switch to the Actions tab, search for a node, and add your action steps (read, transform, post, notify, etc.)
- Drag from one step's output port to the next step's input to connect them
- Open each step to configure it, then click Save
Canvas Interface
Here's what the Canvas looks like when building a workflow:
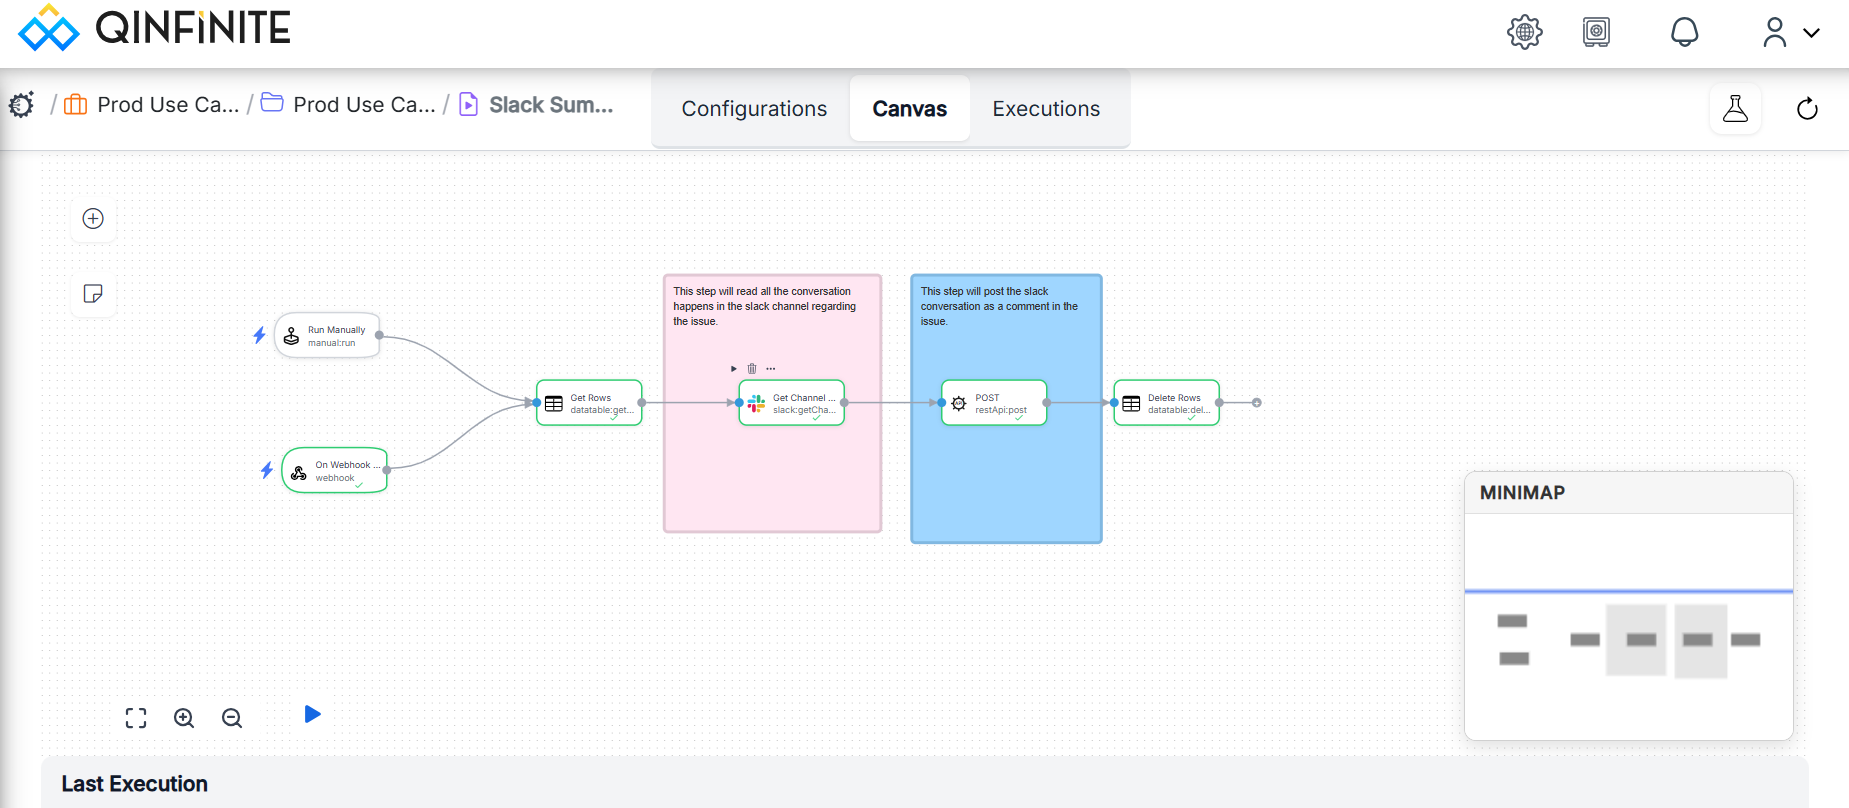
The Canvas shows:
- Triggers on the left (Manual, Webhook, Scheduled execution, etc.)
- Steps connected together with visual connectors
- Color-coded boxes showing different step types
- Output/Input ports for connecting steps
- Minimap on the right for navigating large workflows
4. Run your automation
Once your workflow is built and saved:
- Click the Execute-WorkFlow play button in the Canvas toolbar — it appears only when the job has a manual trigger
- Watch the execution flow in real-time on the Canvas
- Steps turn green when they succeed, red if they fail
- Open the Executions tab for detailed logs
To test one step on its own, open it and click Execute Step in its config panel. This is enabled only while the job has a manual trigger; otherwise the button shows "Enable a manual trigger to execute steps".
View results
- Canvas: Real-time visual execution flow
- Executions Tab: Full logs and step-by-step outputs
- Slack: Your message appears in the configured channel
5. Set up automation triggers
To run your job automatically, add a schedule trigger. Each trigger is its own node from the Step Palette — you add a Schedule trigger alongside (or instead of) the Manual one; you do not switch an existing trigger's type.
- Open the Step Palette and go to the Triggers tab
- Add the Schedule trigger to the Canvas
- Open it and set it to run Every day at 9:00 AM
- Click Save
A job can have more than one trigger — for example, a Manual trigger for testing and a Schedule trigger for production. The Execute-WorkFlow play button appears only while a Manual trigger is present.
Common step types
| Step Type | What it does | Example |
|---|---|---|
| Trigger | Starts the job | Manual, Schedule, Webhook |
| Read Data | Fetches from a source | Google Sheets, Database |
| Condition | Makes a decision | If value > 100, then... |
| Transform | Formats or calculates | Combine fields, math |
| Post Message | Sends to a channel | Slack, Teams, Email |
| Approve | Waits for review | Human approval gate |
Troubleshooting
| Issue | Solution |
|---|---|
| Step fails | Check the Executions tab for error details |
| Data not showing | Verify your Connection is configured with valid credentials |
| Slack message blank | Check the message formatting uses correct step output variables |
| Trigger not running | Confirm you saved the job after making trigger changes |
Next steps
- Jobs & Steps — Learn about workflow structure
- Connections — Set up reusable system access
- Triggers — Schedule and automate execution
- Integration Nodes — Explore all available actions